When you say the word: SCRAPBOOK it normally divides people into two categories. 1. I LOVE SCRAPBOOKING! or 2. I don't have time to scrapbook...can you relate to one of these two? Me too, both! LOL!
That's why I want to share a secret with you that has changed the way I view scrapbooking. It's called the Power Layout, termed this by Creative Memories TM. I've put my own spin on the PL and I'd like to share my version with you.
Step 1 Print & Put in Order
This may seem obvious to some, but then again, it is a step and it does take time. With the literally hundreds of digital photos to choose from, select your favorites, make copies of them, drop them into a copied file for printing, select an on line printing company, such as Snapfish.com or many others, and then print your photos.
When your photos arrive, take the time to put them in order from oldest on top to most recent on the bottom of the stack. For instance, if the most recent pictures were taken in January, you would put all your January pictures together at the top of your stack, then your February pictures, and ending with December at the bottom of the stack. Also if you are doing multiple albums such as a family album, child album, and grandparent album (this is ambitious I know :), now is not the time to sort into multiples. Sort into months first, then after they are sorted in order of months, then you can more easily divide your multiples.
Step 2 Lay Out Photos
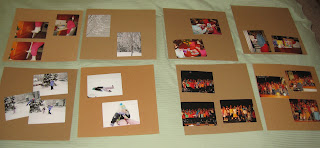
Lay out your photos onto pages the same size you will be scrapbooking into. For my layout, I choose 12x12 sheets of cardboard, but this is not recommended for long term storage since card board contains acid and will ruin your photos. CM does make a PL box for this purpose and you can contact a consultant on line to purchase one if you'd like.
Step 3 Accessorize
For step 3 there will be two steps involved. Make sure you purchase papers, stickers, borders, flowers and accessories to help enhance and tell the story of your pictures. A great place to find unique papers and accessories is Joanns, CTMH constultans, or Stampin UP consulants. Look through your pictures and purchase themes, colors and accessories that will compliment your pictures - don't get hung up on this process.
Once your have your accessories purchased, lay out your papers and accessories that coordinate with your pictures onto your page, sheet, or board. This will give you a visual idea of how your pictures will flow together. You can use as many or as few pictures as you can fit on a page because you will be trimming down some of your photos in a future step, so keep that in mind.
Step 4 Stack Pages
Once you have all your papers and accessories laid out together, but not neatly yet, you will want to stack your pages in order. The way you stack your pages is working with your oldest pictures as page one or the top page, followed by page two, stacking them in order until your most recent pictures will be on the bottom. For example, if each page we scrapbooked represented one month of the year, January would be on top as page one, followed by February, then March, and so on with your last page ending with December.
Step 5 Scrapbook Photos
Once all your pages are stacked, then you can begin the cropping process or what we might call the scrapbooking process. This first process is the most time consuming because it takes time to gather all your supplies, match up colors and accessories together and decide what order everything goes in. During this last step, you will trim off excess white, or border not needed in your photo. Be sure not to trim off anything of historical reference and be sure to leave some background photos and don't crop all photos down to just people. It's fun to look back at the scenery around you too. When you crop, think in terms of size, like 3x3 or 4x4 and how each picture will line up and try to consider if you will be matting photos or not. Be careful, because you can always trim more, but you can't put it back on a photo.
Once you've trimmed your photos and decided on mats for some you can begin to lay out your pages with paper and accessories and really see the story of your photos come alive. But don't think the story can be told there. Be sure to add journaling and details, including dates, references, ages, and even handwriting detail, not just type written. It is all meaningful when it comes to the precious photos.
You will see that once you follow these simple steps, laying out a 30-40 page album this way will take days rather than years! It's all in the organizational process. If you need more help or have questions feel free to e-mail me directly. I don't sell scrapbooking materials or have anything to do with the industry other than I love teaching people how to organize their photos. I can continue these steps with you if you need additional assistance, just e-mail me directly. I do have over a decade of scrabooking experience and more albums scrapped than one family should ... doing it the PL way :)


No comments:
Post a Comment